Tag Archives: dietitian

Weight Loss: A Long and Winding Road

Expectation: Once I can finally decide to make the changes to lose weight, I should lose weight every week! If it were a line graph it should look like this one:

perceived

Notice that pesky word “should.” Take that word out of your vocabulary.

Should according to whom? THEM???  Who are they? YOU?? Where did you get your information? Most likely from THEM! And if you can’t do what They say you should do, what does that mean? For many, it means they have failed and will never be successful at meeting their goals. And… well, if you’ll never be successful then why even try?

Let’s go get some ice cream.

Next notice that word “never” that flows from “should” thinking. Take that word out of your vocabulary too.

Trying to live up to those ridiculous “shoulds” can lead to all-or-nothing thinking. Do you really think your HEALTH is an all or nothing proposition? Do you really think that a couple of small changes won’t make a difference?

Good news! Small changes DO make a difference!

If you want to set yourself up to restrict (go “on” a diet or be “good”) and then to binge (go “off” a diet or be “bad”) and then repeat again and again… then keep on using “should” and “never.”

And by the way, being mean to animals or rude to service staff make you bad, not eating a snickers bar. Let it go.

If you prefer to be kind to yourself and take advantage of the additive effect of small changes made consistently (did you just let out a big exhale and feel your shoulders drop two inches at that thought?), then let’s talk about what real weight loss looks like.

Reality: Once I finally decide to make the changes to lose weight, it will be a wild, unpredictable, up-and-down ride!

Next is what this can look like – this is my graph of weight loss since January 1.The blue line notes my recorded weights and the orange line is the trend line I was given based on my goal and time-frame – ah, I think I found THEM! (And see, they are telling me what I “should” do!)

actual

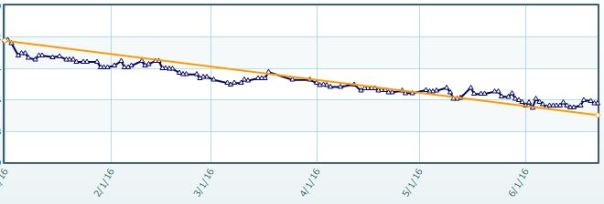
Notice that when you zoom out to look at the big picture, there has been an overall loss. Notice too that when you zoom in to look at a few days at a time, there are times where my weight went down steadily and also where it went up. There are some times that are just up and down and up and down. When you do the math, I’ve averaged a 0.75 pound loss a week. I know a lot of people who would also be upset if they lost that small amount of weight in a week.

I’m not upset because it’s slow. It’s slow because I like Food Truck Fridays… and I’ve been spending more time on Yoga (love!) than Cardio…. and sometimes I’m hungry and tired and surf the couch while other times I’m satiated and energetic and active… and I’m not planning on any of that changing anytime soon.

It’s slow because I prefer to work on a healthy comfortable and enjoyable relationship with food and activity instead of an unhealthy restrictive controlling guilt-ridden relationship.

My hope with this post is to help you appreciate your efforts and be kind to yourself and to relax a little with the scale and numbers and restrictive behaviors. Unfortunately, I know that no matter what I say or write, only YOUR thoughts can change your thoughts. My words can only trigger a little sparkle of a new way to think – a little sparkle that I hope you grow into a great big glowing ball of awesomeness.

Because that’s what you are. One great big glowing ball of awesomeness.

Now, who wants to go get some of that ice cream?

The Secrets of My Success

I recently wrote, “Change your body or don’t – we are all works in progress – but please start from a place of self-love and body-acceptance.” (Blog here). Today, I share some of my journey.

My weight fluctuates. I remember being 13 and thinking I was too fat (at 115 lbs!).

OLYMPUS DIGITAL CAMERA
13 and playing dress-up at my aunt’s place

I also remember being my heaviest in my 20s (190 lbs!).

alexia and chris

Remember Jane Fonda and the thong-leotard-leg-warmers aerobics phase? I jumped on that bandwagon, got my first certification (ACE Group Fitness Instructor) and got down to 125 lbs as an adult – which I maintained for about two deep breaths. I’ve also attained lifetime membership with Weight Watchers twice!

100_3423

My weight goes the 140s to the 170s depending on whether I’m in a calorie-counting-exercising phase or a couch-potato-take-out-dinner phase.

I’m okay with being a “heavier” dietitian. My hope is that it gives people a place of realism from which to start, it reinforces that “knowing” and “doing” are two different things, and it lets people know that I can relate to their challenges since maintaining a socially desirable weight doesn’t come easy for me either!

This year, I’ve focused on bringing my body weight down. My reasons? I like to feel strong (I didn’t) and I have a closet full of super-cute clothes that I want to wear again. Okay, and arms. I love to see my upper arms have a little definition.

Body change will not happen until you are ready and decide what will work for you with your circumstances.

It is EASY to not think about what to eat until you’re hungry and it is HARD to meal plan, shop, and prep.

It is EASY to flop onto the coach at the end of the day and it is HARD to make time (and motivate!) to exercise.

It is EASY to make excuses and it is HARD to find small things you CAN do regardless of circumstances and place responsibility squarely on your own shoulders – where it belongs!

Next is what has worked for me to slowly lose 15 pounds this year – 3/4 pound a week adds up over time.

First was putting some money on the line. I tried DietBet. The app takes your real money from you and challenges you to lose 4% of your weight in 4 weeks. I’ve won 5 games and lost 1. Knowing that I have to make a certain goal or lose $10 – $35 has been incredibly motivating and helped with consistency.

Second was that dreaded meal planning and prepping ahead of time. I started with the New Year, a new notebook, and a heart full of hope. It worked. I have done this faithfully EVERY WEEK since January! It sucks. It’s hard. It takes soooooo long to do the prep sometimes. But it is SOOOOOOOOO worth it! (I do count calories using SparkPeople and have for years – love this site!)

Finally, (and I hate to admit this) a FitBit helped me to get moving. I didn’t realize how sedentary I was. Now I try to get 10-12k steps 4 times a week and 7k on other days. (Note that my employer has incentive money tied to steps – financial incentive helps!) In addition, I tried (and loved!) a yoga studio and promptly signed up for two Intro to Yoga series workshops.

My secrets to success are find something you love for activity, make the time for meal planning and prepping, and put some money on the line!

WHAT ARE YOUR SECRETS TO SUCCESS???

NOTE – There are NO affiliations or sponsorships from any of the linked resources mentioned.

Featured picture from:http://www.niashanks.com/stop-weighing-on-the-scale-for-weight-loss/. The other pictures are obviously mine. Please don’t use them without my permission.

Overnight Oats

“Getting what you want is simple, but not easy.” – Mel Robbins.

I believe this is true when applied to nutrition. I think many of us know WHAT to do – nutrition is really simple once you get away from the hype of the media and uneducated bloggers. We just struggle with ACTUALLY DOING IT – it isn’t easy!

To further my mission of “heart healthy nutrition made easy,” I bring you a way to fit a healthy breakfast into your meal planning. I love the ease of the week when I take the time to do meal preparation on the weekends. In fact, my husband and I have only eaten out about 8 times since the year began five months ago. That was not our goal; but is a happy unanticipated consequence of having a plan in place.

One of the best perks of meal prep is having a hot breakfast for very little work. I’ve been accomplishing this with overnight oats and with pre-chopped vegetables for omelets or “scrambles” if I’m in a hurry. Mason jars are AMAZING for keeping my chopped onion and mushrooms (cleaned with a paper towel, not water) fresh through the week!

However, in my work with my patients lately, I have been hard pressed to find an overnight oats recipe online that works for all of my patients – especially those working on blood sugar control. Once you add oats, dairy, and fruit together, you’ve got a small jar carbohydrate delight that is just an overload for the morning meal.

Note – carbohydrates are NOT bad. Carbohydrates are AWESOME! However, many people tend to eat tooooo many of them. So, please DO NOT ban or severely limit carbohydrates; but many of us could do with reigning in our portion sizes a bit.

Without further ado – my basic overnight oats recipe is below. This serving provides 215 calories and 30 grams of carbohydrates per jar. Feel free to add more fruit and nuts and other assorted yumminess to fit your needs and preferences.

Oh and by the way, Mel Robbins 20 minute video is so worth the time!

Click the recipe title for a printer-friendly version!

Simple-Overnight-Oats

Serves one

Ingredients

1/3 cup of old-fashioned or quick cooking plain oats

2/3 cup of unsweetened almond milk

1 tablespoon of chia seeds

1 Tablespoon peanut butter powder (no sugar added)

1 teaspoon of ground cinnamon

1 teaspoon cocoa powder

1 teaspoon vanilla extract

Directions

  1.  Put all ingredients into a Mason jar or other container and stir to combine.
  2. Store in refrigerator at least overnight (can be made up to 5 days in advance and stored in fridge!)

To serve: This can be eaten cold or hot (microwave 1-2 minutes but do NOT microwave in a plastic container).

Nutrition per serving (entire recipe): 215 calories, 8 grams fat, 7 grams unsaturated fats, 1 gram saturated fat, 0 grams trans fat, 0 milligrams cholesterol, 165 milligrams sodium, 30 grams carbohydrates, 10 grams fiber, 8 grams protein.

NOTES:

The chia seeds act as a thickener (in addition to be a great heart healthy food!) but they are expensive so you can try leaving them out or substituting ground flaxseed.

For those counting carbohydrates to manage blood sugar:  Don’t forget to add your carb grams for any fruit or sweeteners you add!

Spiralized Sweet Potato

Happy New Meal Planning!

I returned to work today and the majority of people are focusing on meal planning as their current focus with their renewed enthusiasm of a new year. Meal planning and preparing foods ahead of time is a wonderful way to have a successful week in terms of meeting your nutrition goals. Two quotes come to mind:

  1. Ben Franklin is purported to have said: He who fails to plan, plans to fail.
  2. Mel Robbins kind of said (forgive me Mel, I paraphrase your Ted talk): You can have anything you want – it’s simple; but it’s not easy.

By the way, I really encourage you to invest 20 minutes in watching Mel’s Ted talk. I watch it every time I need a  motivation boost.

In the interest of helping others who struggle with meal planning, I decided to share my meal plan for this week and links to recipes where possible. I warn you though, this takes time and effort. Expect to spend a good 4 hours in the kitchen… but then relax because your food for the week is DONE!

Sunday:

B = egg white omelet with mushrooms, onions, spinach, shredded cheddar cheese(veggies chopped on Sunday for the week), L = green salad (veggies chopped on Sunday for the week) with Asian Sesame dressing with chicken salad (canned chicken, olive oil mayonnaise, red onion, celery, red grapes, black pepper); Zesty Lime Shrimp and Avocado over brown rice, vegetable soup (garlic, onion, tomato, zucchini, low sodium chicken broth, black pepper, red pepper flakes, basil).

Monday:

B = overnight oats (made for week) with oatmeal, unsweetened almond milk, chia seeds, peanut butter powder, cinnamon, cocoa powder, and vanilla extract with banana sliced into it in the morning, L = Zesty Lime Shrimp on romaine, D = Mexican Sweet Potato Casserole, broccoli, Snacks = yogurt, crackers.

Tuesday:

B = omelet, L = tofu sandwich (chipotle baked tofu, lettuce tomato, whole wheat bread), vegetable soup, D = Mexican Sweet Potato Casserole, brussels sprouts.

Wednesday:

B = omelet, L = green salad with chicken salad, vegetable soup, D = pork chop, edamame pesto pasta (copied from a recipe book so can’t link sorry!) with grape tomatoes, sauteed squash and mushrooms.

Thursday:

B = oatmeal, L = tofu sandwich, vegetable soup, D = pork chop, leftover pasta, green salad.

Friday:

B = omelet, L = green salad with chicken salad, D = Mexican Sweet Potato Casserole (from frozen), broccoli.

Saturday:

B = omelet, L = sandwich, crackers, D = a leftovers meal with whatever remains!

My snacks aren’t planned day by day but they include celery/carrots with hummus or peanut butter; yogurt with grape nuts; or crackers with cheese.

I hope this helps!


D-vine Orange Chipotle Cod

“D”-vine Orange Chipotle Cod: A Dish High in Vitamin D

Vitamin D is one of those vitamins that keeps popping up in the media as beneficial for our health and it’s a vitamin that many of us are lacking. I created a recipe high in vitamin D using Atlantic cod, orange juice, bran cereal flakes, and chipotle. The result was a divine vitamin-D rich Orange Chipotle Cod recipe.

904 Fitness Magazine gave me this challenge to go along with a vitamin D article that is in the May edition. As a dietitian, I love turning to food before supplements so I accepted the challenge!

Facts about Vitamin D

  • According to the CDC, 31% of non-Hispanic blacks, 12% of Mexican Americans, and 3% of non-Hispanic whites have vitamin D deficiency.
  • Vitamin D is called the “sunshine vitamin” because substances in our skin are activated by the UV rays to produce vitamin D. This partially explains why vitamin D deficiency is higher in those with darker skin (which protects against UV rays) as well as those who live in climates with less sunshine or who spend more time indoors.
  • The recommended amount of Vitamin D for adults between 19-70 is 600 IU (international units) per day. A deficiency may cause bone issues such as bone pain, muscle pain or spasms, osteomalacia (soft bones), and rickets in children.
  • Since many people supplement, I’ll also give you the tolerable upper limit, which is 4,000 IU per day. Research is ongoing that is looking at the effects of large amounts of Vitamin D so these recommendations may change in the future. A toxicity may cause bone loss and kidney stones – you cannot overload on vitamin D from sunlight.
  • Vitamin D is important for calcium absorption and bone health. It’s being researched for its impact on heart disease, cancer, immune function, type 2 diabetes, blood pressure, and many other things.

I’m a light-skinned white dietitian who lives at the beach in Florida and even I had low enough levels of vitamin D that my physician put me on supplements! So, it is difficult to get your D when you rely on sunshine and foods.

Here’s why it is difficult to get enough vitamin D (600 IU) from foods… unless you are willing to swallow cod liver oil or can afford to eat salmon every day!

Food Amount IU (average) Source
Cod liver oil 1 tablespoon 1,360 Natural
Swordfish 3 ounces 560 Natural
Portabella mushrooms (with UV exposure) 1 cup 450 Natural
Salmon/mackerel (fatty fish) 3 ounces 425 Natural
Tuna (light, canned) 3 ounces 200 Natural
Fortified orange juice 1 cup 115 Fortified
Fortified milk 1 cup 115 Fortified
Fortified yogurt 6 ounces 80 Fortified
Fortified cereal 1 cup 70 Fortified
Sardines (canned in oil, drained) 2 pieces 50 Natural
Egg yolk 1 large 30 Natural
Portabella mushrooms (no UV exposure) 1 cup 10 Natural

Note that the fortified foods give an average for the IU of vitamin D and the actual amount can vary quite widely based on the level of fortification. When I was looking for cereals for my recipe, I found cereals with 0% to 25% of the daily value of vitamin D! It’s important to look at the labels for the fortified foods you choose. Also, notice that mushrooms contain much more vitamin D if they have been exposed to UV light. Since the packaged mushrooms in my store didn’t mention UV light on their labels, I asked my grocer about the mushrooms in the store and he had no idea if they were UV-exposed.

I turned to fish and fortified foods to make a “D”-vine Orange Chipotle Cod dish that has 32% of the daily value (~ 200 IU) of vitamin D and packs a nice little spicy kick. This recipe is also heart-healthy with low calories, low saturated fat, no trans fat, and low sodium. It is a little higher in cholesterol than I’d like; but still within heart healthy recommendations.

D-vine Orange Chipotle Cod (click link for a printer-friendly version)

Makes: 4 servings

Ingredients

Orange Chipotle Sauce

  • Chipotle in Adobo: 1 chipotle pepper, de-seeded and chopped plus 1 Tablespoon sauce
  • 1 cup vitamin D fortified orange juice
  • 1/4 cup vitamin D fortified plain non-fat yogurt

Fish

  • 2 large eggs
  • 2 cups vitamin D rich (25% DV) bran flakes cereal
  • 4 6-ounce Atlantic Cod filets
  • Non-stick cooking spray

Directions

Preheat oven to 450° F. Line baking sheet with tin foil and spray with non-stick cooking spray and set aside.

When preparing chipotle peppers, or any hot pepper for that matter, remember that the heat is mostly in the seeds. Chipotles pack a spicy punch so remove these little seeds before chopping to reduce the kick in the sauce.

Deseeding Chipotle Peppers

Begin sauce. Pour 1 cup orange juice, chipotle pepper, and chipotle sauce into small saucepan and heat until mixture just begins to boil. Reduce heat to low and simmer, stirring frequently to prevent sticking until mixture thickens, approximately 35 minutes. Set aside when done.

The thicker drops show that the sauce has begun to thicken - it will continue to thicken after removed from the heat.
The thicker drops show that the sauce has begun to thicken – it will continue to thicken after removed from the heat.

In a shallow bowl, crack eggs and stir to combine yolk and white. Pour bran cereal into another shallow bowl and use measuring cup or the back of a spoon to crush the cereal into small pieces.

Use the back of your measuring cup as a crushing tool for the cereal
The smaller the flakes, the better the coating!

Rinse fish filets, draw through the egg and then press gently into the cereal to coat the fish with cereal. Place fish on foil-lined baking sheet. Repeat with each filet. Sprinkle any remaining cereal on top of fish.

Having everything prepared and close together makes coating the fish much easier

Bake fish in oven for 20 minutes or until done and flesh flakes easily with a fork.

When orange-chipotle sauce has cooled, combine the sauce with the yogurt and stir to combine.

To serve, top each fish filet with approximately 1/4 cup of sauce.

Nutrition Information per serving (1 fish filet topped with 1/4 cup sauce): 315 calories, 5 grams fat (1 gram saturated fat, 0 trans fat), 174 milligrams cholesterol, 375 milligrams sodium, 26 grams carbohydrate (3 grams fiber), 37 grams protein, and 32% DV of vitamin D.

Served with brown rice mixed with chopped mushrooms and spinach – enjoy!

D-vine Orange Chipotle Cod

References as linked above, Nutrition: Concepts and Controversies, and the Linus Pauling Institute.

A Weekly Meal Planner

“ASPIRE” – Six Steps to Healthy Meal Planning

The one best thing you can do to make healthier, nutrition-rich meals, save time and money, and make life easier is to plan your meals ahead of time. You need a strategy to plan healthy meals. If you wait until you are hungry and tired at the end of the day, figuring out what to make for dinner is not easy and you’re more likely to choose something fast, easy, and unhealthy. However, this is one of the things that my clients find the hardest to do.

I’m here to help you “make nutrition easy,” so here is my strategy for you.

Grab some paper, a pen, and ASPIRE to plan your meals. Remembering this acronym will guide you through a simple way to plan meals that are healthy, yummy, and reduce your grocery expenses! I designed my free Weekly Menu Planner just for this! You can use any format as long as you have one column for each day of the week.

A = Agenda

The first thing to do is check your agenda for any commitments, meetings, and changes to your usual schedule. Also check the calendars of the others in your household. This is important so you know which nights you have time to make a meal and which nights you don’t and should plan for leftovers. It also lets you know which nights you need quick and easy meals and which nights you can spend more time on your meal creations. You can also note the days that you have to be out of the house early and may benefit from packing your a lunch the night before. Write down everyone’s commitments that have an impact on meals on the weekly menu planner.

S = Stock

What do you already have on stock, on par, or in your pantry and fridge? Flip your weekly menu planner over and make a list of all the foods in your fridge and pantry (your “stock foods”) on the left side of the back of the paper.

P = Promotions

Check the store promotions. What is on sale this week? What do you have coupons for? We all want to stretch our food dollars and this is one way to do it. If you don’t clip coupons, go to the grocery store’s web site as many are now allowing their customers to electronically collect coupons on reward cards or by their phone number. You can also check one of my favorite coupon sites, Southern Savers, for printable coupons. On the right side of the back of your weekly menu planner, write down the “promotions foods” you plan to buy based on sales, coupons, and promotions.

I = Invent

Put on your creative chef’s hat, and invent meals you can put together using only foods on your list of “stock foods.” If you can’t make anything with what you have in stock, then figure out what you can add from the list of “promotion foods” to make a meal with your  “stock foods”. The idea is to use as few foods from the “promotion foods” list so you make as many meals as you can without spending money on new foods! Once you have invented a few meal ideas, flip your weekly meal planner over and put the meals where they fit best based on your schedule.

A Weekly Meal Planner

Tips

  • Google is your friend. I made this delicious Puff Pastry Tart just by putting “puff pastry,” “spinach,” “sweet potato,” and “healthy easy recipe” into Google!
  • Cook more than you need so you have leftovers from every time you cook! A few tweaks and one night’s baked chicken, sauteed mushrooms and zucchini, and brown rice transform into the second night’s chicken quesadillas.
  • Make the first meal on your weekly planner one that you have all the ingredients for… just in case you don’t make it to the store right away.
  • This is the hard part and it takes time – so save every weekly meal planner you create to re-use for those weeks you don’t want to spend the time and effort doing all this work.
  • Use the food group tallies on the bottom of my weekly meal planner to make sure you are including food from all food groups in your meal plans. Don’t know how many of each food group to include? Here’s a guideline based on a 2,000 calorie diet.

R = Run

Get out and run those errands! Use your list of “promotions foods” to make a shopping list. Clip your coupons. Go to the grocery store and do your shopping.

E = Execute

You spent all that time and effort making a plan, now execute your plan.

Post the weekly meal planner in the kitchen where you can see it. If you have helpers at home, let them know they can start prepping foods for dinners before you get home.

Most importantly, be flexible. This plan is an outline and life happens. You may have forgotten you need fish for one dinner… just push that meal back to another day. You may decide that you are way too tired to cook one night… just pick up your plan the next night.

Always have a Plan B Meal in mind. In my home, it is either flatbread pizza or turkey burgers and sweet potato fries. We always have the ingredients in stock  and, on those nights we aren’t feeling our meal plan, we have a yummy 20-minute, low-effort dinner.

Let me know if you like my strategy. I hope you ASPIRE to give meal planning a try this week!

Delicious, Easy, and Healthy Vegan CrockPot Quinoa Chili

Eat More Beans! Crockpot Quinoa Chili Recipe (Vegan)

Imagine this. You are in the grocery store and you need to buy some beans. In one hand, you hold a can of beans. In the other hand, you hold a bag of dried beans. Which one do you buy?

You probably consider a few things before you decide.

The first consideration may be convenience. The canned beans are ready to go. You can throw those in the microwave and have hot, cooked beans in just a couple of minutes. The dried beans will take much more time because you have to soak them for many hours and then cook them for another couple of hours. Do you have time for this? Do you know how to cook dried beans? Will you forget and then have to come up with a Plan B dinner?

The second consideration may be nutrition. Beans are a nutrition-packed food! If you cook dried beans, then in 1/2 cup of black beans you get 7 grams of protein, 20 grams of carbohydrates, 14 grams of fiber, and 10% daily value of iron with only 115 calories, 1/2 gram of fat, and no cholesterol or sodium! If you choose the canned beans, much of this stays the same; but you get more sodium. If you choose regular black beans, that 1/2 cup can have 500 milligrams of sodium and reduced sodium black beans can have 240 milligrams of sodium. Some canned products are also packaged in cans that have BPA.

Many people don’t consider cost because those other two things are more important. A 15 ounce can of beans gives you approximately 1 3/4 cups of beans for $1.00 to $3.00. A 16 ounce bag of dried beans contains 3 1/4 cups of dried beans which gives you about 9 cups of cooked beans for about  $1.00 to $2.00. If you do the work of cooking dried beans, you get about five times a much for your money!

I used dried beans most of the time and save canned beans for when I don’t want to rely on myself to remember to cook dried beans the day before I need them or I decided on having beans for dinner on the day I grocery shop. I went in search of dried bean recipes that eliminated the need to cook the beans the day before. After reviewing a few recipes for cooking times and methods and a few trial runs, here is what I ended up with.

Crockpot Quinoa Chili

Makes 9 cups cooked chili

Prep time: 15 minutes, Cook time: 6 hours 15 minutes

Skill level: low

Ingredients

1 1/2 cups dried pinto beans

1/2 cup uncooked quinoa, rinsed

1 teaspoon or 2 cloves minced garlic

2 cups frozen corn

1 package (10 ounces) spinach

2 cups low-sodium salsa

1/2 large red onion, chopped

5 cups water

1/2 teaspoon each: Hot Shot (red/black pepper blend) and red pepper flakes

1/4 teaspoon of each ground spice: turmeric, paprika, cayenne pepper, cumin, and chipotle chile pepper

Quinoa Chili Ingredients
Ingredients – Yes, those are pinto beans from Hatch, New Mexico courtesy of a great neighbor!

Directions

1. Layer all ingredients except spices in crockpot in order listed above.

2. Cook on high heat for one hour and then reduce to low heat for five hours. If home, stir occasionally making sure beans and quinoa stay covered by liquid.

3. Add spices and stir before serving.

Quinoa Chili Start
How it starts…

Nutrition Information per 1-cup serving: 138 calories, 1 gram fat (0 saturated, 0 trans), 0 milligrams cholesterol,  225 milligrams sodium, 34 grams carbohydrate, 13 grams fiber, 8 grams protein.

Serving suggestion: Stir in plain Greek yogurt (not vegan!) to cool it down or top with chopped chipotle peppers and hot sauce to kick it up a notch! I added homemade cornbread muffins on the side (also not vegan) following this recipe and sliced tomatoes.

Delicious, Easy, and Healthy Vegan CrockPot Quinoa Chili


Dinner is served!

Weekly Meal Plan: Baked Panko Shrimp and Pineapple Fried Rice

One thing you didn’t know about me until now is that my second job was in a Japanese Steak House where I worked as a hostess. I was young and what I remember most about that job is how difficult it is to dress in a kimono. Below is an old polaroid and the only picture I have from that time… long ago…

Alexia in Kimono 1986

The other things I came away from that job with were a love of sushi and the knowledge that cooked rice should be refrigerated before it is turned into fried rice. With this knowledge, I scoffed at the feedback on the Pineapple Fried Rice recipe, knowing that my fried rice would not be mushy since I knew this trick!

I didn’t measure for this recipe and I used mushrooms instead of the red pepper. The sauce (pineapple, soy sauce, red pepper flakes) is absolutely delicious and I will use this for other recipes. The rice was also really tasty; but unfortunately, it was mushy!

Pineapple Fried Rice

I figured next time, I would also rinse off the rice before putting it in the fridge to wash some of the sticky starch off the rice… however, next time (yes, I already made it again and added diced chicken and broccoli), I used steamed white rice picked up from the local Chinese restaurant. I find that a worthwhile expense because it made a much less sticky rice dish.

For the Baked Panko Shrimp, I simply combined panko and cayenne pepper, then dipped raw shrimp into egg whites and then the panko mixture. I laid them out on a baking sheet covered with tin foil. I suggest spraying this with cooking spray, a step I did not do and I lost half the panko breading on the foil! These were baked at 475 for about 20 minutes.

Baked Panko Shrimp
Baked Panko Shrimp

I served these with sauteed spinach and mushrooms with sliced almonds. YUM!

Dinner is served!
Dinner is served!

Prepping for the Tart

Weekly Meal Plan: Puff Pastry Tart & Cottage Cheese Enchilada

This is the first in a new recurring post. My plan is to do my personal meal planning for the week and then share the recipes and tips from the week with you. My hope is that you will try something new and be inspired with your own weekly meal planning.

One of my recipes this week was based on the foods I had that needed to be used, specifically a big bag of spinach and thawed puff pastry. I found a recipe for a Sweet Potato, Spinach, and Caramelized Onion Tart with Balsamic Reduction that sounded delicious and I had every single ingredient on hand. I reduced the amount of oil from 3 Tbsp to 1/2 Tbsp only used when caramelizing the onions; but that can even be swapped out for starting the onions with cooking spray. If you are trying to improve your cholesterol numbers, use the olive oil and if you are trying to reduce calories, use the cooking spray. I also replaced the honey with agave syrup (what I had) and used about 1/2 Tbsp for the balsamic reduction, which thickened up beautifully!

Prepping for the Tart

I found this to be scrumptious… but… the toppings were too thick. If you make this, I’d recommend using half the spinach and onions (or make two tarts). I piled it up anyway and I think this contributed to the pastry being a bit doughy in the middle (or it could have been that I should have cooked it a little bit longer). I also recommend you serve this on a day that you’ve had enough protein (meat, dairy foods, eggs, beans, nuts, etc.) since it is low in protein. I served this with grape tomatoes that I halved and roasted with mozzarella cheese on top. One tart serves 2-4 people depending on their appetites and what else you serve it with.

Tart Ready for the Oven

My other new recipe this week was enchiladas. I’ve been playing with using cottage cheese in cooking. While I love cottage cheese on its own; I’m kind of enthralled with cooking with it right now. Last week, I made lasagna rolls and they were delicious. I’ll be tweaking that recipe and posting it here in the future. I found myself with 1-cup of cottage cheese and I found a Cottage Cheese Enchiladas recipe. I’m not a huge fan of corn tortillas so I had to purchase those and I need your advice on these (see below).

Of course, I modified this recipe as well. We were out of cheddar cheese so I used shredded mozzarella as the only cheese, I omitted the chives and lime wedge, and I made the enchilada sauce. The sauce was simple, I used diced tomatoes (what I had) and pureed those in the food processor, then added chipotle powder, cumin, garlic powder, red pepper flakes, cayenne pepper and a touch of Splenda. Perfection! To the filling, I added some boiled chicken I had since my dog is currently not feeling well and is on a chicken and rice diet. Omit the chicken to keep this vegetarian.

Enchilada Filling
Enchilada Filling

These were INCREDIBLE in terms of flavor; but they completely fell apart. So, readers, if you know how to handle corn tortillas so they don’t fall apart, please comment on this post – I need your help since I will be making this dish again. I served this with chips and salsa and a side salad of halved grape tomatoes, diced avocado, and lime juice. As you can see, it makes a hefty portion!

A Whole Lotta Enchilada

I do apologize for the quality of the photographs. My wonderful husband got me a Galaxy Tablet for the holiday and I am still learning how to best use the camera… and to be honest, hunger was a factor in not having the patience to get that perfect picture!

The AquaTally Cup (Image from http://aquatally.com)

Mindful Drinking: AquaTally Cup (Product Review)

I’m a water drinker. In fact, I drink my cup of coffee in the morning, drink water all day, and occasionally enjoy a cup of tea in the afternoon or glass of wine or a beer in the evenings. That’s it. No soda, no juice, no fancy energy drinks for me. However, there are still days where I don’t drink that much water. So, I was excited to be able to review the AquaTally cup. The cup is a double-walled, hard plastic, sealed cup with a straw that has a moveable band that allows you to keep track of the number of cups of water consumed during the day. I wondered if AquaTally would help me to drink more water…

First, the basics of water and hyrdation:

Water is an essential nutrient, which means that we must drink water or enjoy other foods/drinks that provide our body with fluids. As I tell my clients, drinking enough water is important for many reasons. For more information, click here.

Interestingly, while researching how much water a healthy person should drink for optimal health, I learned that there is wide discrepancy on the amount. The eight 8-ounce glasses of water rule is a “rule of thumb,” an easy way to estimate and ensure people are getting enough to stay hydrated. The real goal is to drink enough water to replace what your body uses up every day. Your personal needs will vary based on activity level, temperature and humidity, altitude, health conditions, medications, and the water content of the foods you eat.

The two extremes with water are dehydration and intoxication. Dehydration happens when there is not enough fluid in the body. By the time you are thirsty, you have already lost approximately 2 cups of fluids! People who are chronically dehydrated may have a higher risk for heart problems, bladder or colon cancer, gallstones or kidney stones, and urinary tract infections. Water intoxication is when there is too much water in the body. This is very rare; but it is very dangerous.

Now back to the AquaTally cup.

The AquaTally Cup (Image from MyAquaTally.com)

I’m a fan of water cups with a straw since they are easy to drink from, there’s no reverse suction that you get with some squeeze bottles, and I tend not to dribble water all over myself using them like I do with wide-mouthed bottles. When AquaTally approached me to review their cup, of course I was interested since it’s the type of cup I prefer… and I’d recently dropped my current cup a few times and it was looking pretty scratched up and sad.

As soon as I got it, I took a good look at it and here’s what I found:

  • First thing I checked was the bottom of the cup and yes, it is BPA free!
  • It is exactly 2 measured cups when filled up
  • The ring used for tracking cups of water slides very easily; but doesn’t move around on its own
  • The cup seals easily– many of these type of design get off track and are difficult to twist on
  • The cup seals well – I filled it and tilted it and there was no leaking from the lid, of course, if tilted enough so the water hits the opening for the straw, it will leak from that hole
  • It keeps my water cold when I fill it with a few ice cubes and cold water
  • It accidentally got dropped on pavement and it didn’t break and barely got scratched at all – an important consideration for others like me who tend to be a bit clumsy
  • It’s a bit smaller than other cups of this design that I’ve had which means I can carry it more easily in my small hands and it fits in all the cup-holder-pockets on my bags without having to force it

I think this cup would be helpful for those trying to increase how much water they drink. My personal experience is that I did drink more water using this cup on some days. I found that if I was close to getting in 8 cups, the AquaTally cup helped me get to the goal because it brought my awareness to the fact that I was so close. I also think this cup would be useful for those who, for medical reasons, may be trying to limit the amount of fluids they drink or have others/caretakers monitoring their fluid intake. The cup comes in blue, green, or red and it currently sells for $11.95. For more information, check out their Web site at http://myaquatally.com

Overall, I give it a resoundingly positive review. The only negative thing I found about the cup was my disappointment that more people didn’t ask me about it!

Disclosure:

In exchange for reviewing an AquaTally cup, I received a cup from the company at no cost.

Sources: